

Seamless Transactions on the Go: How to Pay with Your Garmin Fenix 7 Smartwatch

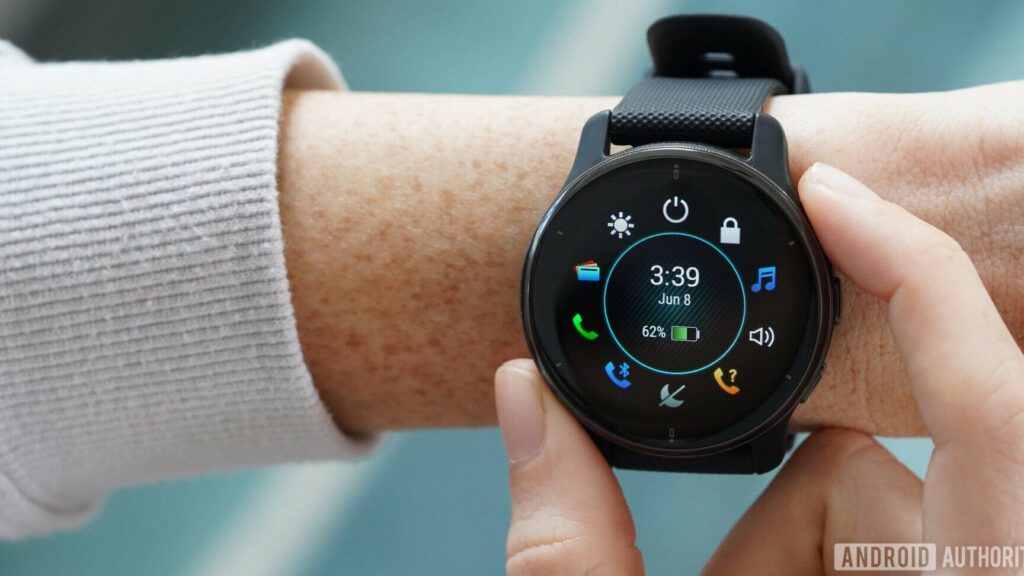
How to Set Up and Use Garmin Pay on Your Fenix 7 Series Watch
Garmin Pay is a contactless payment solution designed for people who are always on the move. If you own a Fenix 7 Series Watch, setting up and using Garmin Pay can make your transactions quick and easy, especially during activities where carrying a wallet or phone is not convenient. Here's how to set up and use Garmin Pay on your device.
Setting Up Garmin Pay
1. Ensure Compatibility: Before you begin, check that your bank supports Garmin Pay. You can find a list of supported banks on Garmin's official website.
2. Install Garmin Connect: Download and install the Garmin Connect Mobile app on your smartphone, which is available for both iOS and Android devices.
3. Pair Your Watch: Open Garmin Connect Mobile and follow the instructions to pair your Fenix 7 with your smartphone.
4. Open Garmin Wallet: Once paired, navigate to the Garmin Wallet within the app. You'll be prompted to create a four-digit passcode for security purposes.
5. Add Your Card: Tap on the '+' sign to add a new credit or debit card. Follow the prompts to enter your card details. You may need to verify your card through your bank's verification process.
6. Sync Your Watch: After adding your card, sync your Fenix 7 with Garmin Connect Mobile to update your watch with your new Garmin Pay wallet information.
Using Garmin Pay
1. Access the Wallet: Press and hold the light button on your Fenix 7 to bring up the controls menu. Select the wallet icon to access Garmin Pay.
2. Enter Passcode: Input your four-digit passcode if prompted. This passcode is required for security and must be entered if more than 24 hours have passed since the last time you entered it or if you have put the watch back on after taking it off.
3. Select Card: Choose the card you wish to use for the transaction from the cards available in your Garmin Wallet.
4. Make Payment: Hold your Fenix 7 near the contactless payment reader until you see a confirmation that the payment was successful. Ensure that the watch face is close to the reader for the best results.
Remember that while Garmin Pay offers convenience, it's important to keep your passcode secure and to only use this feature with trusted payment terminals. With Garmin Pay set up on your Fenix 7, you can enjoy the ease of making payments right from your wrist, whether you're out for a run, at the gym, or just grabbing a coffee after your workout.
How do I set up Garmin Pay on my Fenix 7?
To set up Garmin Pay on your Fenix 7, follow these steps:
1. Ensure your Fenix 7 is paired with your smartphone through the Garmin Connect app.
2. Open the Garmin Connect app and go to the Garmin Pay section.
3. Select Create Your Wallet and follow the prompts to add your credit or debit card information.
4. After your card is verified by your bank, create a 4-digit passcode to secure your wallet.
5. Once set up, access Garmin Pay on your Fenix 7 by holding the light button and selecting the wallet icon.
Remember to keep your watch within close proximity to the card reader for a successful transaction.
What banks and cards are compatible with Garmin Pay on the Fenix 7?
Garmin Pay on the Fenix 7 is compatible with many banks and cards from various countries. The compatibility list includes major credit and debit cards from networks like Visa, Mastercard, and some regional payment networks. To check if your specific bank or card is supported, you should visit the official Garmin website for the most up-to-date list of compatible banks and cards.
How do I make a payment using my Fenix 7 at a contactless payment terminal?
To make a payment using your Fenix 7 at a contactless payment terminal, first ensure that you have set up Garmin Pay in the Garmin Connect app and added a credit or debit card. Then, press and hold the light button on your Fenix 7 to access the controls menu. Select the wallet icon to open Garmin Pay. Choose your card and enter your passcode if prompted. Hold your watch near the contactless reader until you see a confirmation that the payment was successful.

Seamless Payments on Your Wrist: How to Use Your Galaxy Watch 4 for Effortless Transactions

Are Google Smartwatches Secure for Making Payments? Unveiling the Truth Behind Wearable Payment Safety

Xiaomi Smartwatch: Revolutionizing Secure Payments on Your Wrist

Top Secure Smartwatches for Safe Online Payments: Which Ones Make the Cut?

Exploring the World's Most Secure Vault: A Deep Dive into Unbreakable Security Systems

Exploring the Variants: A Comprehensive Guide to the Apple Watch Series 6 Lineup
Go up
Deja una respuesta