

Secure Your Data: A Step-by-Step Guide to Password-Protecting Individual Cells in Excel

Step-by-Step Guide to Password-Protecting Individual Cells in Excel
Protecting specific cells in Excel with a password is a valuable skill for safeguarding sensitive data while allowing access to other parts of your spreadsheet. Here's a step-by-step guide to help you secure individual cells:
1. Open your Excel workbook and select the cells you wish to protect. To select multiple cells that are not adjacent, hold down the Ctrl key while clicking on each cell.
2. Right-click on one of the selected cells and choose Format Cells from the context menu.
3. In the Format Cells dialog box, navigate to the Protection tab.
4. You will notice that the Locked option is checked by default. This doesn't affect the cells until you protect the worksheet. Leave this option checked for the cells you want to protect.
5. Click OK to close the Format Cells dialog box.
6. Now, click on the Review tab on the Excel ribbon.
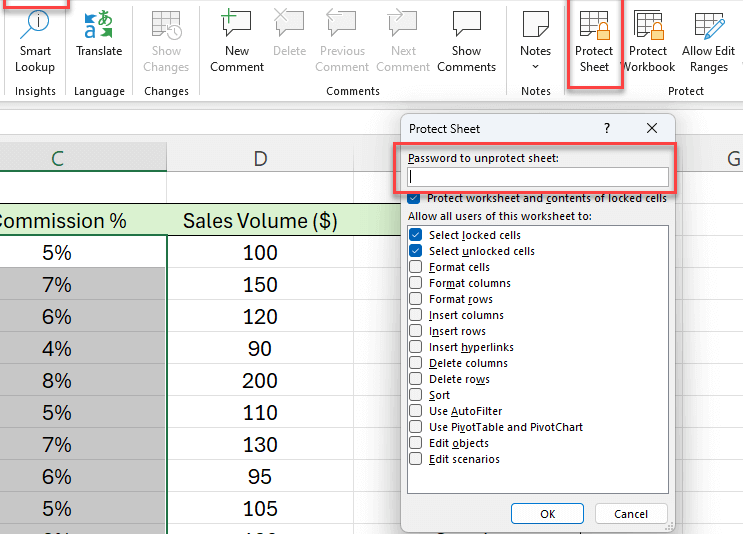
7. In the Review tab, click on Protect Sheet.
8. The Protect Sheet dialog box will appear. Here, you can enter a password in the field provided. This password will be required to unprotect the sheet and make changes to the protected cells.
9. You can also specify what users are allowed to do once the sheet is protected. For instance, you might want to allow users to format cells, sort data, or use autofilter, among other options. Check or uncheck these options based on your preference.
10. Once you've set your password and adjusted your options, click OK.
11. Excel will prompt you to re-enter the password for confirmation. Enter the password again and click OK.
12. Your selected cells are now password-protected. Other users will not be able to edit these cells without the password.
Remember, if you forget the password, there is no way to recover it, so make sure to keep it in a safe place. Additionally, protecting cells is different from encrypting a file; it's a layer of security within the document rather than full encryption.
How can I lock specific cells in an Excel worksheet with a password?
To lock specific cells in an Excel worksheet with a password, follow these steps:
1. Select the cells you want to lock.
2. Right-click and choose Format Cells, then go to the Protection tab.
3. Check the Locked option (it's usually checked by default).
4. Click OK.
5. Now, go to the Review tab on the ribbon.
6. Click on Protect Sheet.
7. Enter a password, confirm it, and set your desired options for what users can do.
8. Click OK.
Now, only the cells you've locked will be protected by the password you set.
What are the steps to apply password protection to certain cells without protecting the entire Excel sheet?
To apply password protection to certain cells without protecting the entire Excel sheet, follow these steps:
1. Select the cells you want to protect.
2. Right-click and choose Format Cells, then go to the Protection tab.
3. Check the Locked option (it's usually checked by default).
4. Go to the Review tab and click on Protect Sheet.
5. Enter a password and confirm it.
6. Ensure that the Select locked cells and Select unlocked cells options are checked if you want to allow selection.
7. Click OK to apply the protection.
Now, only the cells you've formatted as "Locked" will be protected by the password you set.
Is it possible to set different passwords for different cells within the same Excel workbook, and if so, how?
No, it is not possible to set different passwords for individual cells within the same Excel workbook. Excel allows you to protect the entire worksheet or workbook with a password, but not specific cells individually. You can, however, lock or unlock specific cells and then protect the sheet which will require a password to make changes to those locked cells.

Inserting An Image Into An Excel Cell With A Formula

Creating A Pareto Chart In Excel

Freezing Rows, Columns, And Cells In Excel

Building A Search Function In Excel
Mastering The IF Function In Excel

Locking And Protecting Cells In Excel
Go up
Deja una respuesta